Deadline Funnel + MailChimp
Get started with Deadline Funnel and MailChimp!
Deadline Funnel can help boost your sales for your marketing campaigns in MailChimp! 😎
Each subscriber in your sequence will be automatically assigned their own custom deadline - whether you're doing a webinar... an email sequence... an automated launch... or really ANY type of campaign.
If you're not using a deadline you're leaving money on the table!
Here's a quick guide on how to get started with Deadline Funnel + MailChimp, so you can build your evergreen funnel.
1
Create Your Deadline Funnel campaignFirst things first - you will need to create a campaign in Deadline Funnel before you can set up the integration with MailChimp.
When creating your campaign, we recommend selecting the blueprints option and then choose the "Email Sequence + Special Offer" blueprint:

Then you'll set the deadline length and add your first funnel step(s). Don't worry too much about those two items - you can come back later and change those at any time.
Once you've created your Deadline Funnel campaign, you will be taken to the Quick Start Guide, where you can verify that the correct trigger has been selected.
Now you can follow the steps below to integrate with MailChimp.
We're here to help! Contact us on live chat (bottom right corner of the screen) Monday - Friday, 6am-6pm EST. Or you can shoot us an email any time at help@deadlinefunnel.com. 🙂
2
Set up the MailChimp integrationCreate a webhook in your MailChimp list
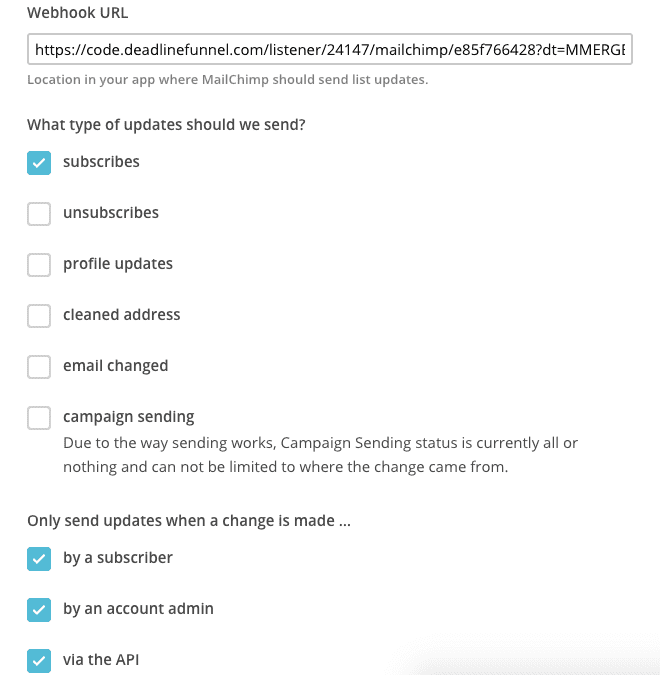
The deadline will be started for each subscriber when they either subscribe to that list or to a specific group in that list

3
Add Deadline Funnel Email links to Your AutomationOnce the integration is up and running, any subscriber who goes through your automation will start their Deadline Funnel tracking as soon as they reach the "webhook" in your automation.
That's the first key part for Deadline Funnel tracking - tracking the email address of each subscriber as they go through your automation.
The second critical part for Deadline Funnel tracking is to add Deadline Funnel email links to the emails in your automation, wherever you're linking to a page that has a Deadline Funnel timer or redirect on it.
That would normally be your special offer page, which normally would get redirected to a different page after the deadline expires.

Please note that you cannot integrate Deadline Funnel + MailChimp correctly unless you add the DF links to your emails!
Email Timers And Dynamic Deadline Text (optional)
You can customize your MailChimp emails with an animated timer, or add a dynamic date and time. Step-by-step instructions for adding those can be found in the following articles: